I’ve been noticing a lot of people spreading misinformation, outdated information, or just generally bad practices (installing a different desktop environment on Linux Mint, which will cause all sorts of issues, for example) when it comes to VRChat on Linux, especially in VR.
This guide aims to be THE definitive guide to getting VRChat not just running on Linux, but running as well as your system can run it.
Please let me know if there’s anything I could improve!
I can best be reached via Telegram.
This guide also assumes you’re brand new to Linux. If you’re not, skip to “getting VR working”!
One thing to note: Linux is not Windows, don’t treat it like Windows. Be open to looking for alternative software! Be open to learning how to repair your system if you break something! Everything is fixable on Linux! You may have to get your hands dirty and learn how to use the command line, but I can guarantee that everything has a solution!
First thing’s first, pick a distro. Preferably one that uses Wayland by default since getting VR working on X11 can be a bit of a chore.
If you don’t know what Wayland or X11 are, these are display servers. They’re how you get your desktop! In addition to display servers, you also have a display MANAGER. Which, you guessed it, manages your display server. These are what give you your login screen!
If you’re running Gnome (Fedora Workstation) or KDE (Fedora KDE Plasma Desktop), you can easily check by opening settings, and going to about. Gnome has an extra click but KDE tells you right away.
If you’d rather not figure out what display server you’re using, or just want a distro that “just works” I highly recommend going with Fedora.
Ubuntu (or derivatives like Linux Mint) can be extremely hit or miss with VR, plus you have outdated packages which may not play nicely with your hardware.
These instructions will be tailored towards Fedora as that’s what I recommend for beginners and advanced users alike, since it tends to Just Work™.
Got a distro chosen? Great, let’s get started!
Don't have one picked?
If you don’t have a distro picked, go with Fedora. It’s the easiest distro to get started with, and any gains provided by a “gaming distro” are minuscule at best, or placebo at worst.
First thing’s first - BACK YOUR DATA UP. EVERYTHING YOU WANT TO KEEP
This will include your VRChat projects (located in %LocalAppData%/VRChatCreatorCompanion. Copy and paste this into an Explorer window and it should open a folder) if any, as well as all of your personal data.
I am not responsible if you lose your data!
While that’s copying, let’s get Fedora written to a spare USB drive!
Hover over the “get Fedora” text in the navigation bar at the top.
AGAIN: You WILL need a USB drive you don’t mind getting wiped.
It’s not on me that you didn’t read the warning!

The only options that matter here are Workstation or KDE Plasma. Choose Workstation if you want something more Mac-like, or KDE Plasma if you’d rather stick with something familiar. In this case, I’ve chosen KDE Plasma.
Click download now under the render of a laptop, which should take you to this page:

It looks daunting but scroll down a bit and you should see an option for Fedora Media Writer.
Click the “Windows and Mac” option. This will take you to a Github page.

You want the version that has win64 in the name.

Once that’s done, run it, and follow the instructions. Again the only ones that matter are Fedora Workstation and Fedora KDE Plasma Desktop.
Yes, I know, it’s redundant to have already chosen an option, then to need to choose it again.
Installing Fedora
Once you’ve downloaded it and written it to the USB drive, reboot your computer.
First of all, we need to make sure secure boot is disabled. Your computer won’t boot into the USB drive without disabling it. Look for instructions for your specific motherboard, laptop, or prebuilt (Googling “BIOS key” followed by your motherboard/laptop/prebuilt model should pull something up!)
Once you’re done with that, set the boot order so that USB is first. Remember to change it back once you successfully boot into Fedora!
Now, let’s install it!
When you boot, you’ll see something that looks like this. Choose the first option, and let it boot. You’ll see a bunch of text scrolling past. This is normal.

Fedora KDE specific instructions
If you went with KDE, feel free to explore! Your changes won’t be saved while you’re here.
If you connect to wifi here, you should be automatically connected when you boot for the first time.
When you’re ready to install, open KDE’s partition manager.
Select the drive you want to install it on, then click new partition table.

Leave it at GPT, then click create new partition table.

Now, click apply, then click apply pending operations in the popup that appears.

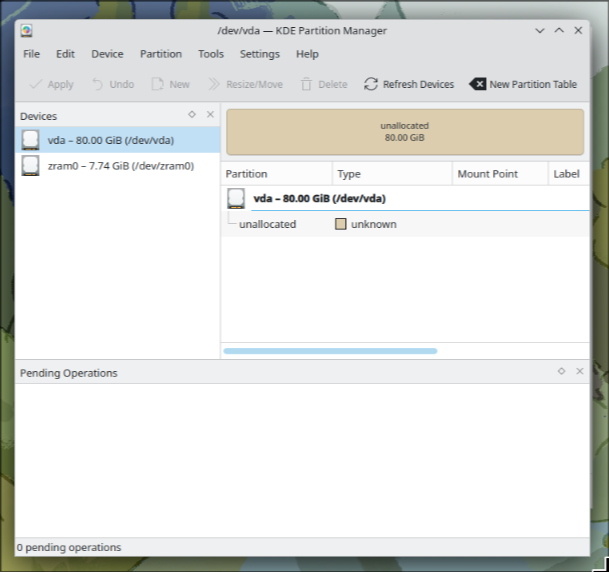
Once you’re done, and it looks similar to this, close KDE partition manager.
Now, click the big install to hard drive button, or the icon on the desktop if you closed the welcome center.
NOTE: As of Fedora 43, the installer is the same as the Workstation one! Follow those instructions!
The only difference is that you need to create an account during installation.
Once it’s done, click finish installation, reboot, then unplug the USB drive when your machine reboots.
Fedora Workstation specific instructions
Once you boot for the first time, you should be presented with this:

This screen is the Overview, and it’s how you’ll launch programs. Click anywhere on the wallpaper to get out of it.
First, connect to wifi if you need to. Click the indicators in the corner, then click the arrow next to wifi, then connect to your network.

Now, click Install Fedora and wait for the installer to launch.

Select your language and keyboard layout, then click next.
If you have multiple drives, select the one Windows is on, and select use entire disk

Click next, then next again (encryption is optional)
Once you’re done, click erase data and install.
Once installation is done, click exit to live desktop, then reboot. Once your system reboots, unplug the USB drive.
Set the system up, enabling third party repositories.
Take the tour if you want to.
I don’t want to wipe Windows
Dualbooting is slightly complicated, since Windows creates a 100MB EFI partition and Fedora needs at least 1GB. The EFI partition holds the information an operating system needs to boot. If you’re booting via BIOS instead of UEFI, you won’t need that, but chances are unless you’re on a PC older than twelve years, you’re booting via UEFI.
Fedora KDE specific instructions
Open KDE Partition Manager and click the drive that looks similar to this

The first partition should be a small ~100MB FAT32 partition. This is your EFI partition. We need to shrink it to make room.
Right click the NTFS partition, click resize and move, then enter 900 in the free space before box.

Hit enter or click on a different text box and click ok.

You should see something like this. Expand the fat32 partition to fill that space.

Once that’s done, shrink your Windows partition. Leave some free space! KDE Partition Manager will show how much is used in a colour when it’s not highlighted, and a darker version of that colour when it is. Click and drag the edge to shrink it. Finally, click okay.

Continue with installation as normal, selecting automatic partitioning
Fedora Workstation specific instructions
Open the installer, click next, click the icon next to the trash can, then resize the Windows partition
Congratulations! You’re now free from the tyranny of Microsoft! Welcome to the Penguin Side™!
IMPORTANT: After install you MUST update.
Fedora makes this simple, as both the Gnome and KDE versions SHOULD tell you when there’s updates!
Fedora KDE update instructions
Discover is pinned to the taskbar (KDE calls this the panel, and you can have as many as you’d like!). Click it. Once it opens, click on updates. Don’t worry if it says fetching, you’ll just have to wait a bit.

Once it’s done, click on update all, and wait. Once the updates are done downloading and installing, click restart to install updates now, then install updates and restart.
Fedora Workstation update instructions
Open the overview by either clicking the weird capsule thing with the circle next to it or hitting the Windows key (Linux calls this the “Super” key, and sometimes alt is referred to as “Meta”!)
Open Software.

Let it check for updates if it hasn’t already notified you.
Now, click updates in the top bar, then click the coloured (if you chose an accent colour, it will be that colour) restart and update button.

Okay! Now that that’s out of the way, you’ve installed a Linux distro, and you’ve updated, let’s get drivers working!
The vast majority of drivers are built right in, so most things should just work!
AMD/Intel
Good news - you don’t have to mess with drivers! They’re built right in!
NVIDIA
NVIDIA GPUs tend to be a bit of a hellscape on Linux. Thankfully, Fedora makes this pretty simple!
Fedora KDE (or if you didn’t enable third party repositories during initial setup on Fedora Workstation)
First, we need to enable third party repositories. These are the same steps that Workstation’s initial setup does packaged in a nice one-liner that you can copy and paste into a terminal window.
sudo dnf install https://mirrors.rpmfusion.org/free/fedora/rpmfusion-free-release-$(rpm -E %fedora).noarch.rpm https://mirrors.rpmfusion.org/nonfree/fedora/rpmfusion-nonfree-release-$(rpm -E %fedora).noarch.rpm && sudo dnf config-manager setopt fedora-cisco-openh264.enabled=1 && sudo dnf install rpmfusion-\*-appstream-data
Driver installation
FINALLY we can install drivers! Open a terminal and paste this in, then reboot after it’s done:
sudo dnf install akmod-nvidia && sudo dnf install xorg-x11-drv-nvidia-cuda
Drivers working? Great! We can move on!
Basic setup
Steam
Fedora KDE instructions
Open Discover, click search, then search for Steam, install it, and type your password when prompted.
Fedora Workstation instructions
Open Software, click search in the top corner.
Now, search for Steam, and select it, then click install. Type your password if prompted.
If you don’t know how Steam works, why are you even here? Install VRChat, or set your dedicated game drive up using the instructions below.
DO NOT install SteamVR. We won’t need that.
Dedicated game drive setup
If you have a dedicated game drive, there’s a little work we need to do to get it to work properly under Linux! Chances are very high your game drive is NTFS, and Linux doesn’t really like NTFS.
If you don’t plan on switching back to Windows, feel free to just format the drive as Btrfs (if it’s an SSD) or EXT4 (if it’s a hard drive) and reinstall your games, making sure to back up any modded game installs!
If you don’t really wanna reinstall your games, or plan on just trying Linux out for a short time, keep going.
Fedora KDE instructions
Open KDE partition manager and type your password. Then find the drive, right click the partition your games are stored on, and click edit mount point. Check users can mount and unmount, then type the path you want it to be found at. Make sure it’s /run/media then whatever you want, like games or data (for example, /run/media/games). Click okay, then save changes.
Fedora Workstation Instructions
Open Disks, select the drive your games are on, click the gear icon, click edit mount options, turn off “user session defaults”, go down to mount point, change the path to /run/media/Games (or whatever you’d like it to be, it just has to start with /run/media. Just make sure to keep it in mind for the next step), click okay, then type your password and hit enter.
Now that that’s done, open a terminal and type ln -s ~/.steam/steam/steamapps/compatdata /run/media/Games/SteamLibrary/steamapps/compatdata
Replace /run/media/Games/SteamLibrary with wherever your games are stored. The important part is /steamapps/compatdata. If the folder has folders with names like common, downloading, workshop, and a bunch of files starting with appmanifest, you’ve found your Steam library.
Getting VR working
Now comes the “fun” part. Let’s get VR working!
This part doesn’t matter if you’re using Fedora Workstation or Fedora KDE, just remember the steps you used to install Steam!
Open either Discover or Software, and search for Envision, then install it.
Once you launch it, at the bottom of the window, you’ll have various options.
If you have a Quest headset, you’ll wanna select WiVRn.
WiVRn prerequisites

If you see something like this, and chances are you will, copy that command and paste it into a terminal.
Quest setup
On your Quest, download the WiVRn app from the Quest store, then connect to your PC and confirm the PIN.
If you have a SteamVR headset (Valve Index, HTC Vive, etc), use the Lighthouse driver.
Lighthouse prerequisites

If you see something like this, and chances are you will, copy that command and paste it into a terminal.
If you have the Oculus Rift CV1, you’ll want OpenHMD.
OpenHMD prerequisites

If you see something like this, and chances are you will, copy that command and paste it into a terminal.
If you have a Windows Mixed Reality headset (Acer/HP/Lenovo/Dell branded), you’ll want the WMR option.
WMR prerequisites

If you see something like this, and chances are you will, copy that command and paste it into a terminal.
Regardless of what headset you have, click the hamburger menu in the top corner (three lines), then click plugins and enable WlxOverlay-S and WayVR Dashboard.

It won’t be as clean as launching through SteamVR, but it’s better than having to get out of VR just to launch a game.
If everything went well and VR works, launch VRChat and play!
If you’re having trouble with video not playing, you may want to try Proton-GE. Download the .tar.gz file, extract it, and drag the resulting folder (making sure it’s not accidentally a folder within a folder!) to ~/.steam/steam/compatibilitytools.d (note the tilde, this means your home folder! In my case, that’s /home/kasey, so I’d put it in /home/kasey/.steam/steam/compatibilitytools.d), restart Steam, then right click VRChat in your library, go to compatibility tools, and select the Proton-GE version you just installed, and try again.